Showing posts with label banana. Show all posts

Saturday, 4 June 2016

Mum's "Meat Dish" Banana Cake

I call this "meat dish" banana cake because traditionally the recipe actually makes enough to bake it in a meat-dish, and usually we do. It's the perfect cake to whip up to feed a crowd and is always a pleaser with even the fussiest of eaters. I found the recipe in my mother-in-laws hand written recipe journal and this cake, along with the others in the journal have been feeding my husband and his brothers and cousins for decades. So rest assured, it has been rigorously quality assurance tested. 

If you don't fancy making one large tray cake, you could (as I did this time), bake two 22cm round cakes and either ice both, or layer them. I also had enough batter to make a dozen cupcakes, which I've popped in the freezer for another day. 

The chocolate chips were an optional extra that I tried this time, though my MIL wasn't too sure about me changing the recipe, it turned out just as luscious as always. 

You can ice it with cream cheese frosting, a chocolate buttercream, or as I did a simple lemon and/or chocolate icing sugar mixture. Mix 2 cups of sifted icing sugar with 2 tbsp melted butter, and enough liquid to form an icing of your desired consistency. For lemon icing, add lemon juice as the liquid, and for chocolate icing, sift 3-4 tbsp of cocoa powder in with the icing sugar, then add enough water or milk to form the paste. Spread onto the cooled cakes. 

Ingredients (to make one "meat dish" slab cake, or two 22cm round cakes and 12 cupcakes): 

  • 4 eggs, room temperature
  • 2 cups white sugar
  • 7 overripe (practically black) bananas, lightly mashed
  • 1 cup or 175 grams of chocolate chips (optional) 
  • 3 cups of plain flour
  • 2 tsp baking powder
  • 2 tsp baking soda 
  • 225 grams melted butter
Preheat the oven to 180 degrees celsius and grease or line your cake tins. I always grease the sides and line the bottom with greaseproof paper, this means you'll never have any trouble removing the cake from the pan. 

Using an electric mixer (I used a kenwood cake mixer, but a hand mixer would work), beat the eggs and sugar until light light and fluffy, almost foamy - this is the most important bit for a good cake. Meanwhile, sift the flour, baking soda and baking powder into another bowl. 

Add the bananas to the egg mix and beat well to combine, then add the chocolate chips, beat again. 

Pour the sifted dry ingredients on top and either on a low speed with your cake mixer, or with a wooden spoon fold the dry and wet ingredients until just combined (about 6 turns of your cake mixer), some flour may still be visible. Finally add the melted butter and mix again till everything is combined. 

Pour the batter into your prepared cake tins and put into a hot oven. 
Bake times vary depending on the size of your tin: for a large slab cake bake about 45 minutes, round cakes approximately 35 minutes, and cupcakes approximately 20 - 25 minutes. Just keep an eye on them and test with a skewer. When the skewer comes out clean the cakes are done, also, your nose will let you know when they are nearly done as the smell coming from the oven will be amazing. 

My assortment of cakes and mini-cakes...  
... which never last very long


Tuesday, 24 November 2015

Banoffee Tart

Banana and toffee, or more commonly known banoffee pie, has been a favourite of mine since the days of going to Lonestar to order their wicked banoffee. I discovered their caramel was made by boiling tins of sweetened condensed milk for three hours, then simply pouring it in. 
This version also uses sweetened condensed milk, but mixed in a saucepan with butter and golden syrup. Just make sure to keep stirring and watch the pot. Burnt or split caramel is not an ideal situation. Other than a bit of TLC this tart is straight-forward, but as always, sure to impress a crowd. 


Ingredients (serves 8-12) 
Pastry:
  • 1 3/4 cups of plain flour
  • 1/4 cup of icing sugar 
  • 180 grams cold butter, diced
  • 1 egg yolk (reserve white for brushing) 
  • 3 tbsp chilled water
  • greaseproof paper
  • baking beads or rice 

Filling:
  • 2 bananas 
  • juice of 1 lemon
  • 400g tin of sweetened condensed milk 
  • 50 grams butter
  • 2 tbsp golden syrup
Topping:
  •  200 mL cream, whipped
  • 100g mascarpone 
Step 1: Make Pastry
Sieve flour and icing sugar together. Put into your food processor with the diced butter and pulse for a few minutes till all of the butter is mixed in and it becomes a breadcrumb texture. 
Next add the egg yolk and chilled water. Pulse again. When it begins to come together, tip out onto a lightly floured board and lightly knead until you have a smooth dough. 
Flatten into a 15cm disc. Cover in cling film and refrigerate for at least 30 minutes. Pastry is much easier to work with when it is cold. 


Step 2: Bake Pastry 
Preheat oven to 180 degrees celcius. Grease a 30cm loose-based fluted tart tin with butter. 
Remove pastry from the fridge and roll out on a piece of greaseproof paper large enough to fit the tart tin. 
Gently lay the pastry over the tin and press into the edges. Use the rolling pin to roll across the top of the tin to cut off any excess pastry. 
Place the greaseproof paper over the pastry and fill the tin with baking beads or uncooked rice (less than a kilo of rice will fill it - reserve the rice afterwards for using again the next time you bake pastry). This holds the pastry in place and stops it both puffing up and from sinking down the sides. 
Chill again for 10 minutes. 
Place in the hot oven and bake for 15 minutes. 
Remove tart from oven and take off the baking paper and rice. Return to the oven for another 15 minutes to finish cooking through. 

Remove from the oven and leave to cool. 

Step 3: Make Caramel
Slice bananas on a diagonal and place in a bowl with lemon juice. Toss gently to cover. 
Set aside while you prepare the caramel. 
To make the caramel, place sweetened condensed milk, butter and golden syrup into a heavy saucepan on a low heat. Stir constantly for 10 - 15 minutes till the caramel starts thicken and the colour darkens slightly, you'll also notice a delicious caramel aroma. 
Work quickly to fill your pastry base. 

Step 4: Fill the Base
Spoon a small amount of caramel into the tart base, and spread to cover the base with the back of a spoon. 
Drain bananas and arrange in a single layer over the caramel base. Pour remaining caramel and gently spread to cover evenly. Allow to cool completely before putting on the cream topping. 

Lightly whip the cream to form soft peaks. Beat, then fold in the mascarpone. Then dollop the cream mixture over the cooled caramel and spread evenly. Finally grate a little chocolate over the top. Chill, and remove from the fridge about 20 minutes before devouring. 

Use a sharp knife to cut into 8 or 12 pieces. 


Sunday, 5 October 2014

Creamy Cashew Smoothie

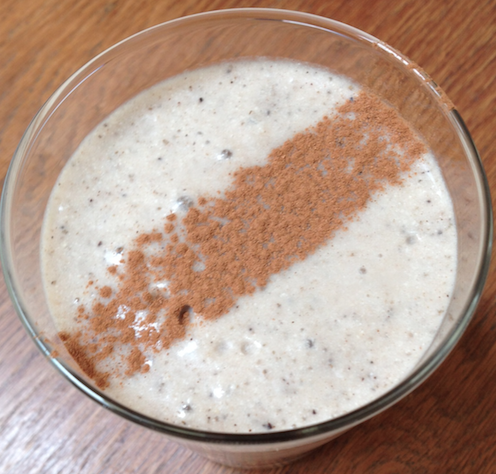
I love smoothies, but don't often drink them because of the dairy, Yes, I love cheese, yogurt ice-cream, but often these delicious foods don't love me. So when I stumbled upon this smoothie recipe I was very keen to try it out, I couldn't help but add cinnamon because I find it adds sweetness, and tastes delicious. The recipe serves one as a light meal, but could be shared between two as a snack. 


Ingredients


1/4c raw cashews (do not use roasted)
1/4c desiccated coconut
1 cup of water
1 tbsp chia seed
1 banana (Frozen is best) 
1 tsp finely ground coffee (optional)
1 tsp ground cinnamon 

Throw all ingredients into a blender (or use a stick blender). Blitz for 1 - 2 mins. You'll notice it getting thicker, that's the chia and cashew absorbing the liquid. 
If you're not a fan of coffee, you could easily leave it out. I'm also going to try it with ground ginger next time. 

Enjoy